Human beings have always been scared of animated pictures. Ancient Egyptians thought they were the work of evil spirits that wanted to steal their souls and their bandwidth (which is why there are no animated hieroglyphs in the Great Pyramid of Giza¹), and historians still don't agree on how many women in the Middle Ages were thought to be witches and burned at the stake for sharing funny cat pictures. Even today, animated pictures are taboo and most people will avoid them at all cost. After consulting many lawyers and my insurance company, I nonetheless decided to share with you these secrets doctors don't want you to know.
Here's how to edit gifs with Gimp.First, if you don't already have Gimp, you can download it
here for free. It is an alternative to Photoshop, and personally I think it is much easier to use and definitely worth installing. It lacks some advanced features Photoshop has (and vice versa), but it's a lot more sensible and less frustrating to use but YMMV.
My layout looks like this:

By default, the panels on both sides are separate windows, but starting with Gimp 2.8 you can also use a single-window mode.
When you open a gif file, every frame will be a layer (on the upper-right side of the window).
Basic stuff to know before editing gifsEvery pixel in an image is usually a combination of three values: Red, Green and Blue. Most of the time, these values can be any integer from 0 to 255 (8-bit encryption). In addition to that, some file formats support a fourth value : transparency. PNGs supports transparency values from 0 to 255 while gifs only support 0 and 1 (1-bit alpha channel). This means a pixel in a gif image can only be either fully visible or fully invisible, thus gifs can't have smooth edges (no way to prevent outer aliasing). Also, any given gif file can only contain a maximum of 255 different colors.
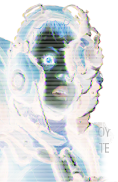
Here's an example of gif limitations compared to PNG

Left: PNG Right: GIF
Importing a gifGimp can import images from a URL. Very handy when editing pictures from the internet because you don't have to save them on your hard drive first.

Select
Open Location and paste the URL in the box and Gimp will do the rest. You can also drag and drop a picture from your browser directly into Gimp, which is even more convenient.
If you already have it on your hard drive, you can open a picture via
File>Open... or drag and drop the file into Gimp.
Now, if you only want to crop a picture, you can skip the next step. If you intend to add something, change colors, resize the picture, or alter it in any other way, you'll want to convert it to RGB mode first.

All gifs are in
Indexed mode.
Indexed mode is like painting by numbers, with up to 256 different numbers. You can't draw with a colour that is not already in the palette (it will select the nearest color in the palette, and the result will most likely be ugly). By converting a picture to
RGB mode, you get rid of the palette, so you can use any color you want.
Of course, once you are done, you'll have to convert your image back to
Indexed mode (
Image>Mode>Indexed...), or Gimp will use it's default palette.

Pick
Generate optimum palette for a better result. You can check
Enable dithering of transparency in some cases.

Top: RGB mode
Middle: Indexed with dithering
Bottom: Indexed without dithering
Dithering is useful to keep gradients or to give a style to the image, but it will often make it look worse.
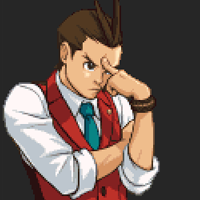
Cropping and resizing a gifLet's take Kamak's avatar as an example.


There's a lot of unused space around this image. There is an easy way to crop it. Select a layer and click on
Layer in the main menu bar, then select
Autocrop.
This crops all unnecessary space around that layer. Do the same with every layer (Ctrl+F). Once this is done, click on
Image in the main menu bar and select
Fit canvas to layers. This will resize the canvas so that it contains all layers and nothing else.

This should be the result.
You can also change the size of the canvas manually (Image>Canvas size...).

Resizing the canvas will only crop the picture or add a margin. To resize the whole picture, you'll have to select Image>Scale Image... and enter the values you want.
Since 2.8, Gimp supports mathematical expressions in input boxes, so you can divide the width by 2 by simply adding "/2" at the end, for example.
Editing how frames interact with each others
The name of every layer contains information about the frame. The name itself is not important, but the parameters are. The first pair of parentheses indicate how long the frame will be displayed (in milliseconds) and the second pair indicate it's disposal. Valid disposal values are "combine" or "replace". Combine means the frame will be added on top of the previous frame(s), and Replace means all previous frames will disappear and be replaced by that one (duh). Unless you are creating a gif by yourself, you don't have to care about the second parameter.
Optimizing gifsGimp provides easy ways to reduce file size without affecting image quality. You can find some under
Filter>Animation.
 Optimize
 will identify all pixels that are left unchanged by the next frame for every frame and open a new file in which these pixels have been erased (and some frames will be set to
Combine or
Replace as needed). This removes unnecessary data and greatly reduces file size.
For example:


First: actual gif (with all frames set to
Combine)
Second: same gif but with all frames set to
Replace just so you can see how unnecessary data was removed. Only the penguin moves, so repeating the rest of the picture on every frame is redundant. The background only needs to appear in one frame, set to
Replace (or left without a disposal value).
Unoptimize does the exact opposite. It is necessary when you want to modify a gif that has been optimized.
Playback lets you watch your animation without having to export it first. Much needed to make sure nothing is wrong.
I usually optimize before switching to Indexed mode and then optimize again. This can help reducing file size a little, since once the picture is indexed, there is a slight probability that new pixels will be made redundant.
Exporting a gifSince 2.8, clicking on Save... or Save as... in the File menu can only save your file as a .xcf, Gimp's own format. You'll have to pick Export instead.
You can then select the target location and write the name (and extension) of the file you want to create. Exporting a .gif will open this window:

You can uncheck
gif comment if you don't want to add one (it probably reduces file size). Be sure to check
As animation.
Don't forget to convert your file to
Indexed mode before exporting it as a gif.
Please use this knowledge for good, not evil.
¹: As shown on a
papyrus found by Napoleon Bonaparte in 1798


